


Hardware components | ||||||
 |
| × | 1 | |||
_ztBMuBhMHo.jpg?auto=compress%2Cformat&w=48&h=48&fit=fill&bg=ffffff) |
| × | 1 | |||
 |
| × | 1 | |||
| × | 1 | ||||
| × | 1 | ||||
Software apps and online services | ||||||
| ||||||
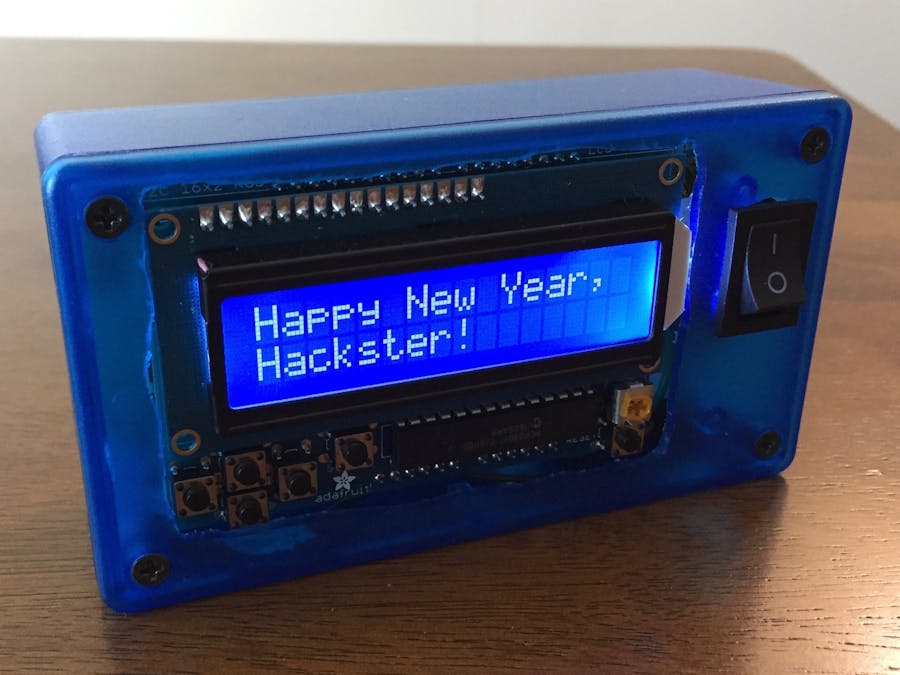
Looking to recreate the glory of the late 90s and early 2000s, I thought I would try to make my own two-way pager, just like Jay-Z used to use! But I’ve found this idea to be more useful than at first glance—I designed it so it could be used by children in lieu of a real cell phone, or it could be used as an “SOS” button for someone working alone outdoors or even exercising (if it was a bit smaller). And for the last few weeks, this device has been always on in my living room where my wife and I leave silly messages for each other.
Summary: This project sends and receives text (SMS) messages via an arduino with cellular modem built into a small enclosure with an LCD display and simple control buttons.
Note that the code for this project includes the ability to run the system from the serial interface so you can build and use a version of this project even if you don't have an LCD shield!
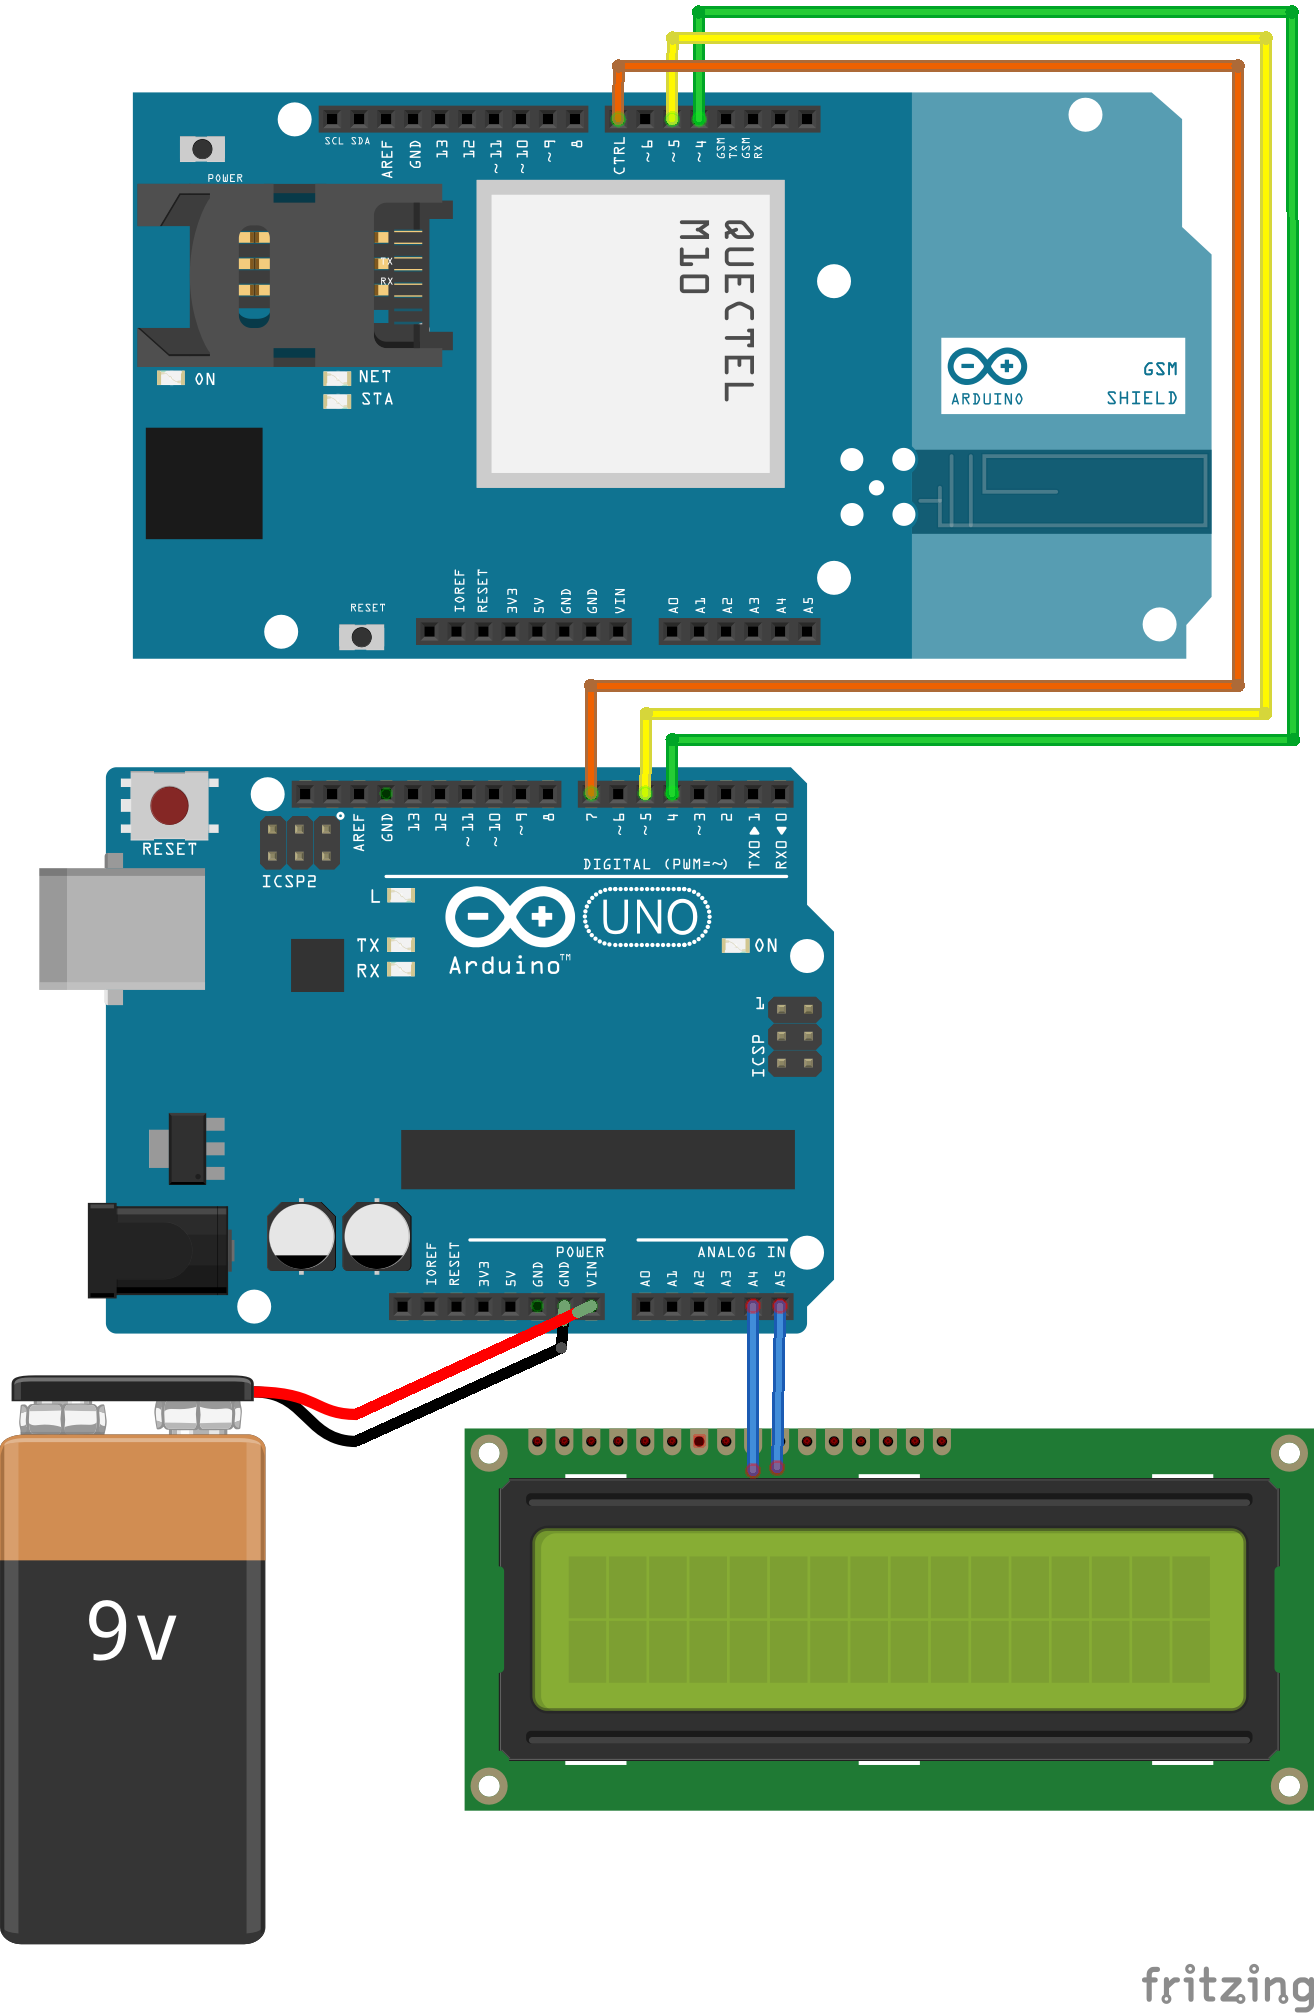
Hardware selectionI had an Arduino GSM Shield I wanted to use with this project along with a SIM card from Hologram, so combining with an Arduino UNO I had made a lot of sense. Adafruit makes an LCD display shield with buttons built-in, and because it uses the I2C bus, it uses only two pins on the Arduino for the display and five buttons, leaving lots of room for future customization.
The LCD has a nice blue background color, so I figured combining it with a translucent blue enclosure would look nice. Stacking the three boards on top of each other made for some very clean connections and was no issue electrically because the two shields use different pins from each other.
- LCD shield: Analog 4 and 5 pins for the I2C bus (along with +5V power and ground [but only the ground next to the Vin pin, not the one next to the 5V pin])
- GSM shield: pins 2 and 3 for software serial, and pin 7 as a power reset (plus power and ground obviously, even though I never saw any details of this in the documentation)
Everything else is free to expand still! Other devices could even still be added to the I2C bus.
During development, the system ran fine on just USB power from my laptop for sending and receiving SMS, though I suspect it will need more power for using GPRS cellular data reliably.
Hologram provides a cellular data service that works with any device that accepts a SIM card. After registering my SIM card for service, with just an extra click I was able to assign it a phone number in my area code of choice. Another feature that makes this project great as a kids’ communicator, for example, is that it’s so inexpensive to keep the service active ($0.40/mo) and I can pause it at any time if I stop using the device. Like most cell phone plans, receiving texts is free and sending is $0.19 each. In the future, this cost can be lowered even further by using a data connection to Hologram’s cloud service where a message can be automatically routed to a free SMS service. $0.60 for one megabyte of data will get you a whole lot of tiny text messages.
For whatever reason, even though the GSM shield was ultimately working properly, it would not correctly run the GSMScanner
and GSMModem getIMEI()
functions designed for initial setup and troubleshooting. Pretty misleading! SMS and GPRS data functions worked fine, so if anyone knows why the modem still can’t tell me its own IMEI number, I’d love to hear your ideas.
Adafruit has excellent instructions to show the LCD shield in action and Arduino has a good getting-started guide for the GSM shield that showcases the important functions, so most of my code was based on those two bodies of functions, plus the addition of my own user interface.
I had never programmed a user interface before that wasn’t entering a letter into a command line with a keyboard, so I wanted to keep it simple. I decided to make a selection of canned messages to send that could be scrolled through with the up and down keys—actually easier than I thought!
Just by stacking the three boards on top of each other with a working SIM card (even from your own phone!) and flashing the code below, you’ll get a text messaging device that works like this:
- Power it on, it boots up, and tells you once the network is connected
- Left button: Go to the “home” screen
- Right button: Acknowledge in incoming message, allowing the next message to come in if there is one. Also dims the screen if there is no current message.
- Up/down buttons: Scroll through selection of pre-programmed messages to send. I guess you could put as many as you want into the code; I started with four.
- Select button: Send the currently selected message
That’s it! Incoming messages are automatically displayed no matter what menu is active on the device, and will even turn the backlight on if it had been off.
The next logical step might be to add a menu of destination numbers for the outgoing messages, or just have it automatically respond to the last message it received (using the remoteNumber()
function).
To cut the openings in the project box, I used a drill for normal holes and then a Dremel multipurpose cutting bit (#561) with guide (#565) for the larger cutouts. Using some extra boards and clamps to make a jig to guide the Dremel would have made for cleaner lines, but I am happy enough with what I did freehand. The bit definitely wanted to wander more than I expected!
The only actual wires in the project are for power to add a 9V battery and switch—without a battery it can be powered from USB or a wall plug and you’re done!
A 9V battery and clip fits nicely next to the Arduino and underneath the GSM shield (which is about the same size as an Arduino Mega). I soldered wires to some header pins to make the power connection easy to attach.
Thankfully the GSM shield had extra long and bendable leads on its pins. I was able to bend them in slightly so that they missed the sockets on the Arduino, leaving those connections free for my power header. I suspect this is why the pins are like that! The LCD shield on top has short and stout pins with no female connections on the front side, so bending pins away is the only method I found to connect things other than the shields in this setup.
Clipping down the USB port solder leads and a few others on the underside of the Arduino allow it to sit flat in the case on some double-stick foam tape. Then the boards stack up to leave the LCD and buttons just barely protruding above the top of the case—perfect!
I’ll keep tinkering with this system and even let my 4-year-old nephew bang it around a little. I think it works pretty well as a messenger, but I was surprised that I like it even more as a tiny billboard in my house to display messages. I’m happy with the aesthetic, which helps there.
Further work on this could it have a second menu for selecting the recipient of a message, automatically dim the display to save power, add lights/buzzers/pager motors for notifications, or any other preferred user interface behavior you could want!
The system could also be fundamentally changed to display notifications from a service like IFTTT, like for if you had a package delivered or someone’s latest tweets. What are you building? How would you improve the system?
Enjoy!
-Mike
You can read more about me and my projects on my blog, including more about this project.
(This project was made possible as part of Hologram's Hacker-In-Residence program. For more information, contact Sheena, Hologram's content coordinator, at sheena@hologram.io)


Comments